


🌸 Easy Crochet Headband Bandana Pattern for Beginners | Stylish & Comfortable Hair Accessory
Looking for a stylish yet practical crochet project? This crochet headband bandana is the perfect handmade accessory that combines beauty, comfort, and functionality. Whether you’re heading out on a sunny day, managing your hair during daily routines, or simply adding a handmade touch to your outfit, this crochet bandana is a must-have.
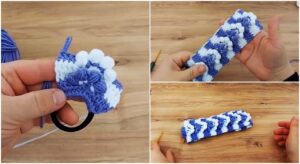
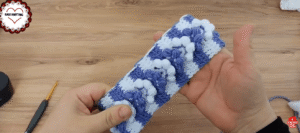
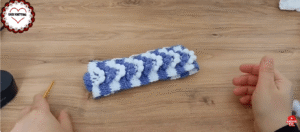
This design features a soft texture and a flexible fit, making it ideal for all head sizes. The combination of simple stitches and decorative elements creates a visually appealing pattern that works for both beginners and experienced crocheters. Plus, it’s a quick project—perfect for those who love instant results!
The crochet headband bandana is especially popular in boho and casual fashion. You can easily pair it with summer dresses, beachwear, or even everyday outfits. By choosing different yarn colors, you can customize your bandana to match your personal style or seasonal trends.

🧶 Why You’ll Love This Crochet Bandana
- Beginner-friendly and easy to follow
- Quick project – perfect for gifting or selling
- Lightweight and breathable design
- Customizable colors and sizes
- Trendy and practical accessory
🧵 Materials Needed
To create this beautiful crochet headband bandana, you will need:
- Cotton yarn (lightweight, breathable yarn recommended)
- Crochet hook (usually 3.5 mm – 4.5 mm depending on yarn)
- Scissors
- Yarn needle (for weaving ends)
- Stitch markers (optional)
Choosing high-quality cotton yarn ensures durability and comfort, especially for summer wear.
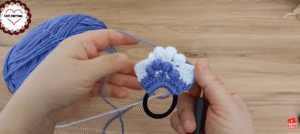
🪡 Basic Pattern Overview
This bandana is typically worked in rows or in a triangular shape. The pattern starts from one end and gradually increases to form the bandana shape. Once the desired width is reached, ties or straps are added to secure it around the head.
Common stitches used include:
- Chain (ch)
- Single crochet (sc)
- Double crochet (dc)
- Slip stitch (sl st)
Even if you are new to crochet, this pattern is easy to learn and gives beautiful results.
💡 Styling Tips
- Wear it as a classic headband to keep hair in place
- Use it as a boho-style bandana for festivals
- Match colors with your outfit for a coordinated look
- Create multiple pieces for different seasons
Handmade crochet accessories like this bandana are timeless and versatile. They also make thoughtful, personalized gifts for friends and family.
📢 Conclusion
This crochet headband bandana is a perfect blend of simplicity and elegance. Whether you’re making it for yourself, as a gift, or to sell online, it’s a project that delivers both style and satisfaction. Start creating your own today and enjoy the beauty of handmade fashion!
crochet headband, crochet bandana, crochet hair accessory, DIY crochet bandana, handmade headband, boho crochet head wrap, easy crochet pattern
click video tutorial :
🌸 Easy Crochet Headband Bandana Pattern for Beginners | Stylish & Comfortable Hair Accessory


