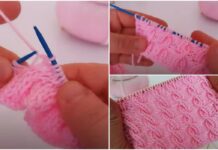
Stylish “Flower” square motif! Simple knitting for beginners
Creating a stylish “Flower” square motif is a delightful project for beginner knitters. This simple yet elegant design can be used for various projects like blankets, scarves, or even decorative pieces. Below is a step-by-step guide to knit a basic flower square motif.

Materials:
- Worsted weight yarn in your chosen colors
- Knitting needles suitable for your yarn (usually size 7 or 8 US)
- Tapestry needle for weaving in ends
- Scissors
Abbreviations:
- CO: Cast on
- K: Knit
- P: Purl
- YO: Yarn over
- K2tog: Knit two together
- PSSO: Pass slipped stitch over

Instructions:
Step 1: Cast On
Cast on 25 stitches.
Step 2: Knit the Base Square
- Row 1: (Right Side) Knit all stitches.
- Row 2: (Wrong Side) Knit all stitches.
- Repeat these two rows until the piece measures about 4 inches or your desired square
- size.

Step 3: Creating the Flower Pattern
You will now start incorporating the flower pattern into your square. The flower is formed using a series of yarn overs (YO) and knit two togethers (K2tog).
- Row 1: (Right Side) K10, YO, K1, K2tog, K1, YO, K1, K2tog, K1, YO, K1, K2tog, K10.
- Row 2: (Wrong Side) Knit all stitches.
- Row 3: (Right Side) K9, YO, K1, K2tog, K1, YO, K1, K2tog, K1, YO, K1, K2tog, K1, YO, K1, K2tog, K9.
- Row 4: (Wrong Side) Knit all stitches.
- Row 5: (Right Side) K8, YO, K1, K2tog, K1, YO, K1, K2tog, K1, YO, K1, K2tog, K1, YO, K1, K2tog, K1, YO, K1, K2tog, K8.
- Row 6: (Wrong Side) Knit all stitches.
- Row 7: (Right Side) K7, YO, K1, K2tog, K1, YO, K1, K2tog, K1, YO, K1, K2tog, K1, YO, K1, K2tog, K1, YO, K1, K2tog, K1, YO, K1, K2tog, K7.
- Row 8: (Wrong Side) Knit all stitches.
- Row 9: (Right Side) K6, YO, K1, K2tog, K1, YO, K1, K2tog, K1, YO, K1, K2tog, K1, YO, K1, K2tog, K1, YO, K1, K2tog, K1, YO, K1, K2tog, K1, YO, K1, K2tog, K6.
- Row 10: (Wrong Side) Knit all stitches.
- Row 11: (Right Side) K5, YO, K1, K2tog, K1, YO, K1, K2tog, K1, YO, K1, K2tog, K1, YO, K1, K2tog, K1, YO, K1, K2tog, K1, YO, K1, K2tog, K1, YO, K1, K2tog, K1, YO, K1, K2tog, K5.
- Row 12: (Wrong Side) Knit all stitches.

Step 4: Finish Off
- Bind Off: Bind off all stitches.
- Weave in Ends: Use the tapestry needle to weave in any loose ends neatly on the wrong side of your work.
Tips:
- Tension: Keep your tension even, especially when working the yarn overs and decreases.
- Practice: If you’re new to YO and K2tog, practice on a small swatch first to get the hang of it.
- Blocking: Block your square to even out stitches and give it a professional finish.
Variations:
- Colors: Experiment with different colors for the flower motif to create a vibrant pattern.
- Size: Adjust the number of stitches and rows to create larger or smaller squares.
Enjoy knitting your stylish flower square motif! This simple yet elegant design will add a touch of beauty to any project.
video tutorial :
Stylish “Flower” square motif! Simple knitting for beginners
